Pages

Wednesday, 21 November 2012

S40 Prov File / Proxy Configuration File

For more information, please visit: http://infokworld.blogspot.com

A prov file is a proxy configuration file written in xml format which is an extension of Nokia s40 phones proxy settings. It contains the IP address, proxy port number, the access point name, username and password of the network operator.

Some internet java applications never seem to connect on certain Nokia S40 phones and this is where prov file/proxy file comes in. It enables such application to connect to the access point.

When a prov file is sent to a Nokia s40 phone, it doesn’t get saved in the file manager like other files such as media and application, rather, it appears as a configuration settings the way our local network providers settings would do if we request provisioninal settings. For example, when an MTN Nigeria subscriber sends SETTINGS to 3888, MTN will automatically send a prov file to the phone making it appear like a configuration settings.


When a prov is sent to an s40 phone, this is where it has effect menu>>settings>>config settings>>default config settings and prefered access point settings

For it to have this effect, you don’t sent it with a usb cable or through mms, you send it via a wireless connection e.g, infrared or bluetooth.

When the prov file has been sent, locate where it’ll have the effect as was directed above, activate the new settings, go back once and locate Activate default in all app. Select it and head to prefered access point settings where you’ll choose the appropriate access point for your default settings. (though some settings’ll automatically choose it’s access point, depending on the compilation)

There are different ways to create a procv file. You can create it online at our mobile site


You can as well create it offline on your computer by using an application called Proxy File Generator

"Unable to Send Protected Object" Problem on S60V3

For more information, please visit: http://infokworld.blogspot.com

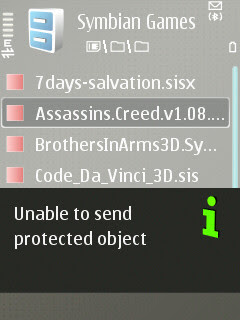
“Unable to send protected object”

This is the most common error message you get when you try to send symbian and java games or applicatioms from your Series 60 smartphone. Normally you can’t send games and applicatios directly from your phone’s file manager except with file system applications like Xplore. But in this this post, I’m not going to talk about using Xplore, I’m only gonna talk about how to send these so called protected items directly to another phone via bluetooth or infra-red.

 
Locate the file you want to send from your file manager and follow these steps:

1.Change the extension of the protected file (majorly games and applications installation files) by renaming it to ‘mp3′ eg: ‘Opera6HandlerUI.jar’ to ‘Opera6HandlerUI.mp3′

2.Select ‘send via bluetooth’ and transfer the file to the other phone.

3.Open the bluetooth message and it will open using the media player.It may say “unable to play media clip”, but it is possible to save the file to a location in your phone.You can save it either in the memory card or in the phone memory.

4.Then go to the directory you saved the file in and rename it, changing the extension back to the original one. eg: ‘Opera6HandlerUI.mp3′ to ‘Opera6HandlerUI.jar’

5.Then run the application and it will work perfectly.

*However certain phones are unable to open the bluetooth message and save it, for those users it is advisable to download and reinstall real player, which enables the phone to open and save the bluetooth message.

S60V3 Quick Hack Kit

For more information please visit: https://infokworld.blogspot.com

There are various methods to hack your series60 3rd edition smartphone but the easiest way is by using BINPDA Quick Hack Kit. Are u wondering why you need to hack your phone? I’m sure you must have seen annoying errors like ‘certificate error’ and ‘certificate expired’ during symbian games and application installation. This makes your phone incapable of installing unsigned applications you might badly need.

All you need to do to bypass this is to follow these easy steps to hack your phone.

 
This hack method is the easiest way and what you need is an application called BINPDA hacking kit.

It contains special install server for 3250, E61, E50 and 5500. You need to know your device OS (operating system) before you continue and if you don’t, check http://www.gsmarena.com get full info on your smartphone.
 
During installation, U will be prompted to install these applications:
 
*BiNPDA Security Manager
*Installserver 9.2,9.3
*Installserver 9.1
*Installserver E50
*Installserver E61
*Installserver 3250
*Installserver 5500
*CapsOff Drive 9.1
*CapsOff Drive 9.2

You are to mark only-
 
1. BINPDA security manager
2. Install server that matches your phone Operating System (example, N73 is OS 9.1)
3. Capsoff driver that matches your phone operating system. (example, N81 is OS 9.2)

You are to mark ONLY 3 OPTIONS as described above. Make sure the rest are unmarked.
After installation, open ur application folder and open SecMan after which your phone will re-boot. Or do it manually. After your phone is back on, open secman again and select install root certificate from the options. That’s it! U’re done!

Download Quick Hack Kit.

"Only 70 Sets Allowed, Settings Discarded"

For more information please visit: https://infokworld.blogspot.com

“Only 70 Sets Allowed
Settings discarded”

This error message is very common with S40 (series 40) phones like Nokia 6300, Nokia 5300, Nokia 5310, Nokia 3110c etc. It makes the phone unable to save any new configuration settings.

Every time a new configuration setting is saved in a Nokia S40 phone, it makes a new folder in the phone memory. It remains there even if you delete that configuration settings and maximum limit is only 70 folders. So if you are facing problem in saving new configuration settings, this is the solution.

 
1. Download any mobile media browser like “Oxycube” (google it) and install in pc.
 
2. Connect ur phone using bluetooth or cable.
 
3. Go to phone memory “C” in which you will find a folder “omadm”
 
4. In that folder there are 70 folders naming 1 to 70.
 
5. Delete some or all of them and the problem is solved!.

A List Of Nokia Series40 (S40) Phones

For more information please visit: https://infokworld.blogspot.com

Below is a comprehensive list of Nokia Series 40 *S40( phones available as at the time of creating this post.


SERIES 40
S40 1st Edition

(128×128 )
Nokia 2355
Nokia 6651
Nokia 3125
Nokia 6610i
Mokia 6560
Nokia 6012
Nokia 6015i
Nokia 6015
Nokia 3205
Nokia 3108
Nokia 3120
Nokia 2650
Nokia 7200
Nokia 6810
Nokia 6820
Nokia 3105
Nokia 6225
Nokia 3200
Nokia 3100
Nokia 6108
Nokia 7250i
Nokia 6585
Nokia 3300
Nokia 3300
Nokia 6220
Nokia 6800
Nokia 6200
Nokia 6100
Nokia 7210
Nokia 6610
Nokia 7250
Nokia 5100
Nokia 6800

(96 x 65)
 
Nokia 3587i
Nokia 3587
Nokia 601
Nokia 3586
Nokia 3586i
Nokia 3595
Nokia 3585i
Nokia 8910i
Nokia 3530
Nokia 3510i

(128×160)
Nokia 7600

S40 2nd Edition

(128×128 )
Nokia 2626
Nokia 2610
Nokia 5140
Nokia 5140i
Nokia 6020
Nokia 6030
Nokia 6230
Nokia 3220
Nokia 6235
Nokia 6235i
Nokia 6822
Nokia 7260


(128×160)
Nokia 6060
Nokia 6080
Nokia 6070
Nokia 5070
Nokia 6103
Nokia 6102i
Nokia 6155
Nokia 6155i
Nokia 6152
Nokia 6255
Nokia 2855
Nokia 3152
Nokia 3155
Nokia 3155i
Nokia 7270
Nokia 7360
Nokia 6102
Nokia 6101
Nokia 6170
Nokia 8800 (208 x 208 )
Nokia 8801 (208 x 208 )
Nokia 6230i (208 x 208 )

S40 3rd Edition

(128×160)
Nokia 3109 classic
Nokia 3500 classic
Nokia 3110
Nokia 6086
Nokia 5200
Nokia 6085
Nokia 6151
Nokia 2865i
Nokia 2865
Nokia 6136
Nokia 6125
Nokia 6165
Nokia 6111

(240×320)
Nokia 6131NFC
Nokia 6300
Nokia 6133
Nokia 5300
Nokia 6288
Nokia 7390
Nokia 7373
Nokia 6275i
Nokia 6275
Nokia 6126
Nokia 6131
Nokia 6282
Nokia 6233
Nokia 6234
Nokia 7370
Nokia 6280
Nokia 6265i
Nokia 6265
Nokia 6270
Nokia 8600 Luna

S40 3rd Edition : Feature Pack 1

(128×160)
Nokia 6151
Nokia 6136
Nokia 6125

(240×320)
Nokia 6131NFC
Nokia 6133
Nokia 6126
Nokia 6131
Nokia 6233
Nokia 6234
Nokia 8600 Luna
Nokia 8800 Sirocco Edition (208 x 208 )

S40 3rd Edition : Feature Pack 2

(128×160)
Nokia 3500 classic
Nokia 3109 classic
Nokia 3110 classic
Nokia 6086
Nokia 5200
Nokia 6085

(240×320)
Nokia 6300
Nokia 5300
Nokia 7390
Nokia 7373

S40 5th Edition

(128×160)
Nokia 1680 classic
Nokia 2600 classic
Nokia 7070 Prism
Nokia 2660
Nokia 2630
Nokia 2760

(240×320)
Nokia 3610 fold
Nokia 5000
Nokia 6263
Nokia 6555
Nokia 7500 Prism
Nokia 6267

S40 5th Edition : Feature Pack 1

(128×160)
Nokia 2323 classic
Nokia 2330
Nokia 2680 slide
Nokia 2690
Nokia 3555

(240×320)
Nokia 2700
Nokia 5130 XpressMusic
Nokia 5220 XpressMusic
Nokia 6600 slide
Nokia 6600 fold
Nokia 3600 slide
Nokia 6212 classic
Nokia 6300i
Nokia 3120 classic
Nokia 8800 Arte
Nokia 6301
Nokia 5610 XpressMusic
Nokia 5310 XpressMusic
Nokia 7210 Supernova
Nokia 7310 Supernova
Nokia 7610 Supernova
Nokia 7900 Prism
Nokia 6500 classic
Nokia 6500 slide

S40 6th Edition
 
(240×320)
Nokia 7230
Nokia 7510 Supernova
Nokia X3-00
Nokia 5130
Nokia 6303 Classic
 
320 x 480
Nokia 6260 Slide
Nokia C3-00

Nokia Secret Codes And Tricks

For more information please visit: https://infokworld.blogspot.com

On the main screen or standby, type any of these codes to use them.

*#06# – this displays the unique serial number or IMEI number of your phone

*#0000# – it displays the firmware or software version details

*#2820# – displays bluetooth (BT) device address

Press and hold the ZERO (0) button – starts your default browser and launches your defined hompage

Press and hold the MENU button – This starts the phone task manager where you can switch between running applications. Pressing the CANCEL (c) button terminates a running application.

*#7780# – This Restores user defined settings to factory default settings. Programs, calendars, and contacts are unchanged. You will be ask to input your security or lock code to proceed with the restoration.

*#7370# – Reprograms your phone memory to factory default. all files will be deleted. you will be ask to input your security or lock code to proceed with the phone memory format. backup your messages, contacts, and other important data before proceeding. NOTE: this is equivalent to hard format for Nokia Series 60 1st edition phones (N7650, N3650/60, N-Gage/QD). If you are using Nokia Series 60 2nd and 3rd edition phone (N6600 and above), this code will not fully format your phone memory, you need to do the hard format (4-keys combo code) instead.

*#7370925538# – reprograms your phone’s wallet application. all information on your wallet will be erased and the wallet code will be removed.

How To Flash Your Nokia Phone Through USB

For more information please visit: https://infokworld.blogspot.com

In this post, I’ll be explaining how to flash your Nokia phone or update the firmware using just a usb cable without any flashing box like JAF, Cyclone and the rest of them. All that is needed is a usb cord, two softwares and an internet connection. I previously made two posts on servicing nokia phones. One was how to read nokia phone security code using usb and the other was how to reset the security code back to the default code.

A lot of people often hear about “flashing mobile phones” without knowing what it actually means. Flashing a phone means re-installing the phone’s firmware files, that is, re-installing the operating system of the phone. When a phone’s operating system files are corrupt due to incompatible applications, virus attack and so on, flashing might be the only solution when restoring factory settings doesn’t work. Apart from this, flashing a phone too can be used to update the firmware to a newer version, install a cracked firmware, “wake” a dead phone, etc.

I have to emphasize that flashing a phone shouldn’t be done just for fun as it might be useful and dangerous at the same time. Yes, flashing a phone can wake a dead phone, so also flashing a working phone can kill it!
You should also note that flashing a contract phone such as phones on T-mobile prepaid phone plans may not sit well with your operator and make you lose any warranty you’re entitled to.

ALSO NOTE THAT THESE SOFTWARES

To flash your phone through usb, you need these:

i. Navifirm – to download the phone’s firmware
ii. Phoenix Service Suite
iii. Nokia PC Suite
iv. A good USB cable

1. Install Phoenix. This might take a pretty long time if you’re using a slow computer but you’ve got to be patient

2. Run Navifirm but be sure to have a working internet connection before doing this. It connects to the internet and loads all available Nokia phones firmwares. This too also takes a long time and requires a steady internet connection so you need some patience here too.

3. Be sure your phone’s battery is charged to at least 50% though flashing should take less than 10 minutes.

4. Select your phone type under Products. It is located on the phone just beneath the battery. For example, N97′s product type is RM-505, RM-133 for N73 and RM-596 for Nokia N8. (You can as well check it by dialling *#0000# in standby.)

5. Wait till it loads Releases. From here, you can see all available firmware versions. Select the latest you find there.

6. It now loads Variants, select your desired product code from the list. You can also check beneath the battery to find the original product code.

7. Now select all the files and download. Select Download with IDMM (Internet Download Manager) if you have it installed it on your PC. If not, select, Download with program and choose the destination folder.

8. Go to C:/Program Files/Nokia/Phoenix/Products
Create a folder with the name as your phone product type.
For example, for Nokia N97, the folder will be named RM-505
The firmware files you downloaded will then be located in C:/Program Files/Nokia/Phoenix/Products/RM-505

9. Now run PHOENIX and connect your mobile phone in PC Suite mode. If phoenix detects your phone automatically, skip steps 110-14.

10. In Phoenix, click File > Manage Connections > New.

11. Now select the type of cable you are using. If you are using DKE-2, CA-53, Micro USB cable, select USB.

12. Click Next. It will find your product and say FOUND. If it doesn’t find any, you can try changing your cable type by clicking Back.

13. Click Next and then Finish.

14. Now your cable type (USB) appears in the connection list. Select it. Click APPLY and then CLOSE.

15. Now select File > Open Product.

16. A list of RM codes will open. Select your phone’s RM code.

17. Now select File > Scan Product.

18. Your phone’s firmware info will appear at the extreme bottom of the Phoenix Service Software window.

19. Now select Flashing > Firmware Update. At this point, Phoenix will automatically load the firmware files we talked about in step 8. If it doesn’t, make sure you named that directory accordingly and please go over step 8 again.

20. If everything up to step 20 goes well, select “Refurbish”, wait until the “Successful” dialog box appear (DO NOT touch or disconnect the phone or USB cable during the process). Press OK, phone will disconnect and restart.

At the end Phoenix will tell you to disconnect your phone as the flashing has finished butome phones may not boot up automatically after the flashing has finished. In those cases, remove the battery and then insert it and manually start the phone.

 
FLASHING A DEAD PHONE WITH PHOENIX

 
The procedure is almost same as above but with litle differences.

1. Start Phoenix. Connect your phone through USB Cable (we are flashing a dead phone so the phone is off)

2. Click File > Open Product. Select your RM code from the window that appears. Click OK.

3. Click File > Manage Connections. Select No Connection. Then APPLY and CLOSE.

4. Now select Flashing > Firmware Update.

5. Check the option “Dead Phone USB Flashing”.

6. Click Refurbish and the flashing process is started.

7. After some time, flashing will pause asking you to turn on your phone.

8. Press the POWER button of your phone until the backlight comes up.

9. Flashing will proceed. Your phone will automatically start when the flashing finishes. When done, you can safely remove your data cable from handset.