Pages

Monday, 26 November 2012

Signing In To Two Gmail Accounts At The Same Time

For more information, please visit: http://infokworld.blogspot.com

With the countless number of free google services around, you might be forced to have more than just one google account. You might even have two gmail accounts for different purposes. I, for example, have a normal google account for this blog plus a couple of other google services I regularly use and another google apps account on which my business email is hosted. Sometimes I need to sign in to both accounts but switching between accounts will make one log out and log in countless times. Also, using different browsers to access your different google accounts isn’t the perfect solution. Did you know it’s possible to use to google account (or gmail accounts) at the same time on the same browser?

You do not need a browser add-on to get this done, just go to Google Account Multiple Sessions settings page. From this page you can turn on the settings that enable you to use two google accounts on the same browser at the same time.

 
You have to agree to some times before you’re allowed to use this multiple sign in feature.
After enabling multiple sign in for either of your accounts, you can switch between either of your google accounts by clicking on the arrow beside your email displayed at the top-right corner. It might be necessary to log out of your accounts for this change to take effect.


This doesn’t work with browser cookies and the settings automatically follow you from computer to computer, making it easy to use two gmail accounts at once.

Etisalat Free Browsing on Opera Mini & Bolt Handler

For more information, please visit: http://infokworldblogspot.com


Regards,

Edit .psd Logo Without Adobe Photoshop

For more information please visit: https://infokworld.blogspot.com


Some custom blogger templates often come with a logo file in .psd format. The file is actually a photoshop document and editing this logo might be a problem for those who do no have Adobe photosop installed on their pc and who are not ready to purchase the software. There’s a a program capable of editing this .psd file with the help of a little pluging.

The first time I came across a .psd logo, I ran a google search and found out paint.NET, an image editing software, could do the job reasonably well.

It definitely doesn’t have all the great features found in Adobe Photoshop but it’s relative not a bad bargain ( the software is free but loaded with certain unique features too ).

A light weight software of about 4MB with so much features packed into it! Once installed, unzip photoshop.zip (PSD plug-in), put PhotoShop.dll in Program Files\Paint.NET\FileTypes and restart Pain.NET


File size: 4.80MB

Requirements: Windows XP/2003/Vista/Windows7/XP64/Vista64/Windows7 64
 
.Net Frameork
 
License: Freeware
 
Homepage: http://www.getpaint.net/

Download Youtube Videos as MP3 Audio

For more information please visit: https://infokworld.blogspot.com

We all know there are lots of musical videos on youtube but sometimes, you might wish to have those musical videos as MP3 audio files in your phone music player instead. This post explains how to convert Youtube videos to MP3 files online and downloading the mp3 file directly to your phone or computer.


Go to http://m.youtube.com or http://www.youtube.com, search for the video file. After that, copy the link.

* Open another tab, go to http://www.youtube-mp3.org

* In the Query box, paste the youtube video link u copied earlier


* Click on Convert video button, the audio link will be generated and u can now download the file

Webcam Recorder For Yahoo Messenger, MSN, Skpe etc.

For more information please visit: https://infokworld.blogspot.com

Spending your leisure time chatting on your yahoo messenger or other IM applications like Skype or MSN messenger can be fun but if you’ve ever considered recording your video chat, then this post is definitely for you. CamStudio 2.0 is an application that can record your companion’s webcam during IM chat. It can record either in .avi (video) or .swf (flash) format.

It’s such a cool application to have especially if you wanna watch those video chat sessions over and over again. ;) There are lots of softwares like this across the internet but most of them are sharewares. They are trial versions you can only use for a while but CamStudio is an open source program and given out free of charge.

 
Apart from being able to record webcam from videos, CamStudio can also records all screen and audio activity on your computer and create industry-standard AVI video files and using its built-in SWF Producer can turn those AVIs into lean, mean, bandwidth-friendly Streaming Flash videos (SWFs).

Here are just a few ways you can use this software:

* You can use it to create demonstration videos for any software program

* Or how about creating a set of videos answering your most frequently asked questions?
 
* You can create video tutorials for school or college class
 
* You can use it to record a recurring problem with your computer so you can show technical support people
 
* You can use it to create video-based information products you can sell
 
* You can even use it to record new tricks and techniques you discover on your favourite software program, before you forget them

HOW TO EXTEND YOUR LAPTOP BATTERY LIFE

For more information please visit: https://infokworld.blogspot.com

Here are a few steps you can take to stretch out the available electrons in your battery.

Adjust your power settings:

 
To take advantage of power-saving features the manufacturer has built into your laptop, you’ll want to consult your user manual, as they vary from one machine to the next. But you can also give battery life a significant boost by tweaking the power options in your operating system.

Here’s how:
 
Windows Vista gives you control of how your laptop manages power by bundling various hardware and system settings into three default power-plan options:
 
Balanced offers full performance when you need it, but conserves power when your laptop is idle.
 
Power saver gives the biggest boost for extending battery life, but results in lower performance.
 
High performance maximizes system performance at the expense of battery life.
 
Switching between plans is a simple two-step process:
 
1. Click the battery meter icon, located in the notification area on the Windows taskbar.
 
2. Select one of the three default power plans: Balanced, Power saver or High performance.

Windows XP offers two power schemes designed for laptops and other portable PCs:

The Portable/Laptop power scheme minimizes power use to conserve battery life, but adjusts as your processing needs change so system speed isn’t sacrificed.

The Max Battery power scheme also minimizes power use but doesn’t adjust to changing processing demands. This setting is meant for situations requiring minimal processing, such as reading documents or taking notes.

To switch from the Portable/Laptop power scheme to Max Battery:
 
1. Click Start, and then click Control Panel.
 
2. In Control Panel, verify that you’re in Category view, and then click Performance and Maintenance.
 
3. In the Performance and Maintenance window, click Power Options.
 
4. On the Power Schemes tab of the Power OptionsProperties dialog box, click the arrow under Power Schemes, and then click Max Battery.
 
5. Click OK.
Care and maintenance of your battery
 
There are a few best practices that can help preserve battery life:
 
-Keep your laptop battery out of extreme heat.
 
-Clean the battery with dry cloth, especially at the metal connectors.
 
-Defrag your hard drive regularly so it runs efficiently.
 
-Clean your battery contacts with rubbing alcohol periodically.
 
-Use Hibernate mode rather than Standby mode.
 
-When plugged in to the AC outlet for a long period of time, Take out the battery from the system.
 
-Fully discharge the battery once a month by unplugging the AC power cord. After that, charge it again completely.
 
Saving power on the fly
 
Here are some quick things you can do for short-term gain when you suddenly realize you don’t have enough juice to last through a meeting or plane ride:
 
-Dim your display; the less brightness the less power consumption.
 
-Close down unessential programs and keep graphics use to a minimum.
 
-Remove devices you aren’t using, such as a USB flash drive or a DVD.

How to Unlock Your Huawei USB Modem

For more information please visit: https://infokworld.blogspot.com

Most service providers sell customized huawei modems which they’ve already programmed to work only on their network. You might get a prompt to enter an unlock code if you try to use a sim from another service provider on these USB modems. There are several ways to unlock these huawei modems though.

Some kind person in a web forum might create a topic on this, asking people to drop ther modem’s IMEI number but the best way to do it is DOING IT YOURSELF!

There’s a modem unlock tool in our mobile site

It’s a very effective tool which I’ve used on several occasions and it’s never failed once. All you need to do is to key in your IMEI number and hit “Enter”
You get your unlock code starught up!

Click here to check out this tool.

You can as well unlock it wit Universal Mastercode. This also works for Nokia, LG and some other products apart from Huawei USB modems.

Download Universal Mastercode from Mediafire or Rapidshare.

1. Select Huawei from the tabs

2. Enter your IMEI in the provided space and click calculate

3. Insert an unauthorized sim in your modem and plug it in

4. Enter the unlock code when the prompt message comes up

5. You’re done!

Wednesday, 21 November 2012

How To Manually Configure Nokia Phones

For more information, please visit: http://infokworld.blogspot.com

Sometimes you might need to change your operator default settings and use proxy in order to browse free. Below are carefully illustrated steps you can follow to manually configure your phone. I’ll be using default settings for MTN Nigeria for all examples.

For s40 phones
 
E.g 2600, 2630, 3110c, 5200, 5300,7900, 7610, 7510, 7500, 7390, 7373, 7370, 7310, 7210 7100, 6600flip, 6600slider, 6555, 6500s, 6500, 6301, 6300i, 6300, 6288, 6282,6280, 6275, 6270,6267, 6265, 6234, 6233, 6212, 6133, 6131, 6126, 5610, 5310, 5300, 5220, 5130, 5000, 2700

Press Menu >>> Settings>>> Configuration Settings >>> Personal Configurations >>> Option >>> Add new >>> Web

Account Name: MTN WAP
Homepage: wap.mtnonline.com
Username: web
Password:web verify:web
Use preferred access point: No
Access point settings
Proxy: Enable
Proxy address:10.199.212.2
Proxy port: 8080
Data bearer: Packet data
Bearer settings
Packet data access point:web.gprs.mtnnigeria.net
Network type:IPv4
Authentication type:Normal
Username:web
Password:web

The next is Nokia s60 (symbian)
 
E.G 6110, 3250, 3600 slide,6111, N70, N71,N72, N73, N75,5700, N76, 5070,7900 crystal prism, 7900prism, N77,N78, 2610, N79,5630 xpressmusic, 6500classic, 8800 arte,5500, 6212 classic, 6650,E55, 5310, E50,E51, 8600 luna, 6500 slide,6710 navigator, 3610 fold, 7370,7610 supernova, E60, 3555,7373, N81 8gb, E65,E66, 5300, 6210 navigator,E61, 3110 classic, E62,E63,N81, N82, N95 N958GB

Press Menu >>> Tools >>> Settings >>> Connection >>> Access points >>> Option >>> New Access Point >>> Use Default Settings.

Connection name: MTN WAP
Data bearer: Packet data
Access point name: web.gprs.mtnnigeria.net
Username: web
Prompt password: No
Password: web
Authentication: Normal
Homepage: wap.mtnonline.com
Option>>>Advanced setting
Change only:-
Proxy server address: 10.199.212.2
Proxy port number: 8080

Unlock / Reset Nokia Security Code

For more information, please visit: http://infokworld.blogspot.com
 

If you’ve forgotten your Nokia phone security code, simply follow the following steps to reset or read the unlock code all by yourself. You’ll be needing only:

i. Nokia PC Suite
 
ii. Nemesis Service Suite
 
iii. Phone data cable

TO RESET THE PHONE LOCK BACK TO DEFAULT

1. First the latest version of Install Nokia PC Suite

2. Then install Nemesis Service Suite (NSS)

3. Now connect your mobile phone to your computer with the data cable. If the phone prompts, choose default mode or PC Suite mode but do not open pc suite yet.

4. Next, start Nemesis Service suite (NSS)

5. Select scan for new devices button (on top right corner of NSS)

6. Click on Phone Info button.

7. Now click the Scan button.

8. Under Power Mode, select Local and then click Change. At this point, your Nokia phone should restart, and you should see the text Local mode across your phone screen.

9. Under Production Data Edit, click Read button. The textboxes should now contain values.

10. Check the Enable check box beside Product Code
 
11. Click Write button.

12. Select Tools button on top

13. Click Factory Settings tab

14. Tick Full Factory button and click Reset button.

15. Final step, go back to Phone Info and click Normal then Change.

Now your security code should be 12345.

 
TO READ THE EXISTING UNLOCK CODE

1. Connect your phone in PC Suite mode

2. Open Nemesis Service suite (NSS)

3. Then click on scan for new devices button (top right hand side)

4. Click on phone info button.

5. Now Click on Scan.

6. Select Permanent Memory.

7. Click on Read.

8. It will read the permanent memory file and save it on the disk at following path.
C:\Program Files\NSS\Backup\pm\.pm

9. Open the .pm file using Notepad.

10. Now scroll until field [308], and on the 5th Record (5=) your security code is saved at there.

11. Like 5=31313131310000000000

12. Remove all “3” digit and it will be 31313131310000000000

13. 11111 is your security code.

Alternatively, you can read the PM file with Nokia BB5 PM Security Code.

How to Use Your Mobile Phone as Webcam

For more information, please visit: http://infokworld.blogspot.com


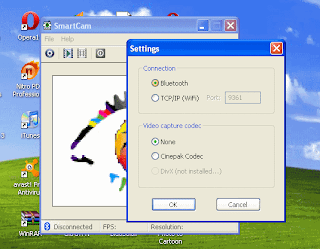
If you happen to be stuck with a personal computer with no webcam and wish to have video chat with your friends on Skype and MSN every once in a while, then this application is just for you. Smartcam turns your mobile phone to a webcam easily. It doesn’t matter whether all you have is a nokia or sony ericsson java phone, a symbian third edition phone or a smartphone running on Android OS. You need to install the Windows executable file on your computer and the install the other application on your phone. You need to select the one compatible with your phone operating system.

In the symbian app, there are three connection types:

* Bluetooth
* USB Cable
* WiFi

I’ve only actually tried the bluetooth connection and it worked perfectly well.

The J2ME App only has bluetooth as the only available connection type.
 
I haven’t tested the webcam application with any Android smartphone but I guess it should work too.

To turn your phone to a webcam, follow the steps below:

1. Run the .exe file on your pc and then run .sis, .jar or .apk file on your mobile phone.

Download the PC software
 

Download a compatible version for your phone operating system


2. Now connect your mobile to pc using Bluetooth.
 
You might as well try other connection modes but as WiFi works on a friend’s Nokia 5800

3. Run the Smartcam program from the desktop.

4. Open Smartcam in your cell phone as well.

5. Now you’re running the application both on your phone and pc, you will have to pair your mobile to your pc with the bluetooth as a meddium of connection.

6. On the PC program, go to File > Settings and select bluetooth as your mode of connection.


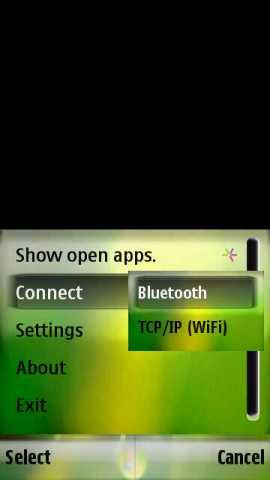
7. In your cell phone select connect and choose the computer device.


8. If you’ve successfully paired your phone with the computer, you’ll see through cell phone’s camera in your computer.

9. Just run your IM application and the smartcam program will be detected as a webcam.

Capture Screenshot on Your Symbian phone

 For more information please visit: https://infokworld.blogspot.com

Screenshot for Symbian OS is a FREE program to take screenshot on your Symbian OS mobile phones (UIQ or S60). You can capture screenshot and save it to a file in JPEG, PNG, BMP or MBM format. The screenshot can be sent directly to a PC via Bluetooth or infrared and another mobile phone. Furthermore, you can customize the shortcut key, file name and delay of capturing. It supports continuous mode that allows you to capture screenshot every a few seconds.


Supported devices: Nokia 3250, N71, N73, N75, N76, N80, N81, N82, N91, N92, N93, N95, E50, E51, E60, E61, E61i, E62, E65, E70, E90.


Supported devices: Nokia 3230, 3600, 3620, 3650, 3660, 6260, 6600, 6630, 6670, 6680, 6681, 6682, 7610, 7650, N70, N72, N90, N-Gage, N-Gage QD.

S40 Prov File / Proxy Configuration File

For more information, please visit: http://infokworld.blogspot.com

A prov file is a proxy configuration file written in xml format which is an extension of Nokia s40 phones proxy settings. It contains the IP address, proxy port number, the access point name, username and password of the network operator.

Some internet java applications never seem to connect on certain Nokia S40 phones and this is where prov file/proxy file comes in. It enables such application to connect to the access point.

When a prov file is sent to a Nokia s40 phone, it doesn’t get saved in the file manager like other files such as media and application, rather, it appears as a configuration settings the way our local network providers settings would do if we request provisioninal settings. For example, when an MTN Nigeria subscriber sends SETTINGS to 3888, MTN will automatically send a prov file to the phone making it appear like a configuration settings.


When a prov is sent to an s40 phone, this is where it has effect menu>>settings>>config settings>>default config settings and prefered access point settings

For it to have this effect, you don’t sent it with a usb cable or through mms, you send it via a wireless connection e.g, infrared or bluetooth.

When the prov file has been sent, locate where it’ll have the effect as was directed above, activate the new settings, go back once and locate Activate default in all app. Select it and head to prefered access point settings where you’ll choose the appropriate access point for your default settings. (though some settings’ll automatically choose it’s access point, depending on the compilation)

There are different ways to create a procv file. You can create it online at our mobile site


You can as well create it offline on your computer by using an application called Proxy File Generator

"Unable to Send Protected Object" Problem on S60V3

For more information, please visit: http://infokworld.blogspot.com

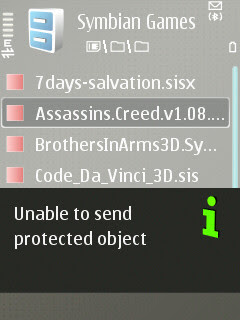
“Unable to send protected object”

This is the most common error message you get when you try to send symbian and java games or applicatioms from your Series 60 smartphone. Normally you can’t send games and applicatios directly from your phone’s file manager except with file system applications like Xplore. But in this this post, I’m not going to talk about using Xplore, I’m only gonna talk about how to send these so called protected items directly to another phone via bluetooth or infra-red.

 
Locate the file you want to send from your file manager and follow these steps:

1.Change the extension of the protected file (majorly games and applications installation files) by renaming it to ‘mp3′ eg: ‘Opera6HandlerUI.jar’ to ‘Opera6HandlerUI.mp3′

2.Select ‘send via bluetooth’ and transfer the file to the other phone.

3.Open the bluetooth message and it will open using the media player.It may say “unable to play media clip”, but it is possible to save the file to a location in your phone.You can save it either in the memory card or in the phone memory.

4.Then go to the directory you saved the file in and rename it, changing the extension back to the original one. eg: ‘Opera6HandlerUI.mp3′ to ‘Opera6HandlerUI.jar’

5.Then run the application and it will work perfectly.

*However certain phones are unable to open the bluetooth message and save it, for those users it is advisable to download and reinstall real player, which enables the phone to open and save the bluetooth message.

S60V3 Quick Hack Kit

For more information please visit: https://infokworld.blogspot.com

There are various methods to hack your series60 3rd edition smartphone but the easiest way is by using BINPDA Quick Hack Kit. Are u wondering why you need to hack your phone? I’m sure you must have seen annoying errors like ‘certificate error’ and ‘certificate expired’ during symbian games and application installation. This makes your phone incapable of installing unsigned applications you might badly need.

All you need to do to bypass this is to follow these easy steps to hack your phone.

 
This hack method is the easiest way and what you need is an application called BINPDA hacking kit.

It contains special install server for 3250, E61, E50 and 5500. You need to know your device OS (operating system) before you continue and if you don’t, check http://www.gsmarena.com get full info on your smartphone.
 
During installation, U will be prompted to install these applications:
 
*BiNPDA Security Manager
*Installserver 9.2,9.3
*Installserver 9.1
*Installserver E50
*Installserver E61
*Installserver 3250
*Installserver 5500
*CapsOff Drive 9.1
*CapsOff Drive 9.2

You are to mark only-
 
1. BINPDA security manager
2. Install server that matches your phone Operating System (example, N73 is OS 9.1)
3. Capsoff driver that matches your phone operating system. (example, N81 is OS 9.2)

You are to mark ONLY 3 OPTIONS as described above. Make sure the rest are unmarked.
After installation, open ur application folder and open SecMan after which your phone will re-boot. Or do it manually. After your phone is back on, open secman again and select install root certificate from the options. That’s it! U’re done!

Download Quick Hack Kit.

"Only 70 Sets Allowed, Settings Discarded"

For more information please visit: https://infokworld.blogspot.com

“Only 70 Sets Allowed
Settings discarded”

This error message is very common with S40 (series 40) phones like Nokia 6300, Nokia 5300, Nokia 5310, Nokia 3110c etc. It makes the phone unable to save any new configuration settings.

Every time a new configuration setting is saved in a Nokia S40 phone, it makes a new folder in the phone memory. It remains there even if you delete that configuration settings and maximum limit is only 70 folders. So if you are facing problem in saving new configuration settings, this is the solution.

 
1. Download any mobile media browser like “Oxycube” (google it) and install in pc.
 
2. Connect ur phone using bluetooth or cable.
 
3. Go to phone memory “C” in which you will find a folder “omadm”
 
4. In that folder there are 70 folders naming 1 to 70.
 
5. Delete some or all of them and the problem is solved!.

A List Of Nokia Series40 (S40) Phones

For more information please visit: https://infokworld.blogspot.com

Below is a comprehensive list of Nokia Series 40 *S40( phones available as at the time of creating this post.


SERIES 40
S40 1st Edition

(128×128 )
Nokia 2355
Nokia 6651
Nokia 3125
Nokia 6610i
Mokia 6560
Nokia 6012
Nokia 6015i
Nokia 6015
Nokia 3205
Nokia 3108
Nokia 3120
Nokia 2650
Nokia 7200
Nokia 6810
Nokia 6820
Nokia 3105
Nokia 6225
Nokia 3200
Nokia 3100
Nokia 6108
Nokia 7250i
Nokia 6585
Nokia 3300
Nokia 3300
Nokia 6220
Nokia 6800
Nokia 6200
Nokia 6100
Nokia 7210
Nokia 6610
Nokia 7250
Nokia 5100
Nokia 6800

(96 x 65)
 
Nokia 3587i
Nokia 3587
Nokia 601
Nokia 3586
Nokia 3586i
Nokia 3595
Nokia 3585i
Nokia 8910i
Nokia 3530
Nokia 3510i

(128×160)
Nokia 7600

S40 2nd Edition

(128×128 )
Nokia 2626
Nokia 2610
Nokia 5140
Nokia 5140i
Nokia 6020
Nokia 6030
Nokia 6230
Nokia 3220
Nokia 6235
Nokia 6235i
Nokia 6822
Nokia 7260


(128×160)
Nokia 6060
Nokia 6080
Nokia 6070
Nokia 5070
Nokia 6103
Nokia 6102i
Nokia 6155
Nokia 6155i
Nokia 6152
Nokia 6255
Nokia 2855
Nokia 3152
Nokia 3155
Nokia 3155i
Nokia 7270
Nokia 7360
Nokia 6102
Nokia 6101
Nokia 6170
Nokia 8800 (208 x 208 )
Nokia 8801 (208 x 208 )
Nokia 6230i (208 x 208 )

S40 3rd Edition

(128×160)
Nokia 3109 classic
Nokia 3500 classic
Nokia 3110
Nokia 6086
Nokia 5200
Nokia 6085
Nokia 6151
Nokia 2865i
Nokia 2865
Nokia 6136
Nokia 6125
Nokia 6165
Nokia 6111

(240×320)
Nokia 6131NFC
Nokia 6300
Nokia 6133
Nokia 5300
Nokia 6288
Nokia 7390
Nokia 7373
Nokia 6275i
Nokia 6275
Nokia 6126
Nokia 6131
Nokia 6282
Nokia 6233
Nokia 6234
Nokia 7370
Nokia 6280
Nokia 6265i
Nokia 6265
Nokia 6270
Nokia 8600 Luna

S40 3rd Edition : Feature Pack 1

(128×160)
Nokia 6151
Nokia 6136
Nokia 6125

(240×320)
Nokia 6131NFC
Nokia 6133
Nokia 6126
Nokia 6131
Nokia 6233
Nokia 6234
Nokia 8600 Luna
Nokia 8800 Sirocco Edition (208 x 208 )

S40 3rd Edition : Feature Pack 2

(128×160)
Nokia 3500 classic
Nokia 3109 classic
Nokia 3110 classic
Nokia 6086
Nokia 5200
Nokia 6085

(240×320)
Nokia 6300
Nokia 5300
Nokia 7390
Nokia 7373

S40 5th Edition

(128×160)
Nokia 1680 classic
Nokia 2600 classic
Nokia 7070 Prism
Nokia 2660
Nokia 2630
Nokia 2760

(240×320)
Nokia 3610 fold
Nokia 5000
Nokia 6263
Nokia 6555
Nokia 7500 Prism
Nokia 6267

S40 5th Edition : Feature Pack 1

(128×160)
Nokia 2323 classic
Nokia 2330
Nokia 2680 slide
Nokia 2690
Nokia 3555

(240×320)
Nokia 2700
Nokia 5130 XpressMusic
Nokia 5220 XpressMusic
Nokia 6600 slide
Nokia 6600 fold
Nokia 3600 slide
Nokia 6212 classic
Nokia 6300i
Nokia 3120 classic
Nokia 8800 Arte
Nokia 6301
Nokia 5610 XpressMusic
Nokia 5310 XpressMusic
Nokia 7210 Supernova
Nokia 7310 Supernova
Nokia 7610 Supernova
Nokia 7900 Prism
Nokia 6500 classic
Nokia 6500 slide

S40 6th Edition
 
(240×320)
Nokia 7230
Nokia 7510 Supernova
Nokia X3-00
Nokia 5130
Nokia 6303 Classic
 
320 x 480
Nokia 6260 Slide
Nokia C3-00

Nokia Secret Codes And Tricks

For more information please visit: https://infokworld.blogspot.com

On the main screen or standby, type any of these codes to use them.

*#06# – this displays the unique serial number or IMEI number of your phone

*#0000# – it displays the firmware or software version details

*#2820# – displays bluetooth (BT) device address

Press and hold the ZERO (0) button – starts your default browser and launches your defined hompage

Press and hold the MENU button – This starts the phone task manager where you can switch between running applications. Pressing the CANCEL (c) button terminates a running application.

*#7780# – This Restores user defined settings to factory default settings. Programs, calendars, and contacts are unchanged. You will be ask to input your security or lock code to proceed with the restoration.

*#7370# – Reprograms your phone memory to factory default. all files will be deleted. you will be ask to input your security or lock code to proceed with the phone memory format. backup your messages, contacts, and other important data before proceeding. NOTE: this is equivalent to hard format for Nokia Series 60 1st edition phones (N7650, N3650/60, N-Gage/QD). If you are using Nokia Series 60 2nd and 3rd edition phone (N6600 and above), this code will not fully format your phone memory, you need to do the hard format (4-keys combo code) instead.

*#7370925538# – reprograms your phone’s wallet application. all information on your wallet will be erased and the wallet code will be removed.

How To Flash Your Nokia Phone Through USB

For more information please visit: https://infokworld.blogspot.com

In this post, I’ll be explaining how to flash your Nokia phone or update the firmware using just a usb cable without any flashing box like JAF, Cyclone and the rest of them. All that is needed is a usb cord, two softwares and an internet connection. I previously made two posts on servicing nokia phones. One was how to read nokia phone security code using usb and the other was how to reset the security code back to the default code.

A lot of people often hear about “flashing mobile phones” without knowing what it actually means. Flashing a phone means re-installing the phone’s firmware files, that is, re-installing the operating system of the phone. When a phone’s operating system files are corrupt due to incompatible applications, virus attack and so on, flashing might be the only solution when restoring factory settings doesn’t work. Apart from this, flashing a phone too can be used to update the firmware to a newer version, install a cracked firmware, “wake” a dead phone, etc.

I have to emphasize that flashing a phone shouldn’t be done just for fun as it might be useful and dangerous at the same time. Yes, flashing a phone can wake a dead phone, so also flashing a working phone can kill it!
You should also note that flashing a contract phone such as phones on T-mobile prepaid phone plans may not sit well with your operator and make you lose any warranty you’re entitled to.

ALSO NOTE THAT THESE SOFTWARES

To flash your phone through usb, you need these:

i. Navifirm – to download the phone’s firmware
ii. Phoenix Service Suite
iii. Nokia PC Suite
iv. A good USB cable

1. Install Phoenix. This might take a pretty long time if you’re using a slow computer but you’ve got to be patient

2. Run Navifirm but be sure to have a working internet connection before doing this. It connects to the internet and loads all available Nokia phones firmwares. This too also takes a long time and requires a steady internet connection so you need some patience here too.

3. Be sure your phone’s battery is charged to at least 50% though flashing should take less than 10 minutes.

4. Select your phone type under Products. It is located on the phone just beneath the battery. For example, N97′s product type is RM-505, RM-133 for N73 and RM-596 for Nokia N8. (You can as well check it by dialling *#0000# in standby.)

5. Wait till it loads Releases. From here, you can see all available firmware versions. Select the latest you find there.

6. It now loads Variants, select your desired product code from the list. You can also check beneath the battery to find the original product code.

7. Now select all the files and download. Select Download with IDMM (Internet Download Manager) if you have it installed it on your PC. If not, select, Download with program and choose the destination folder.

8. Go to C:/Program Files/Nokia/Phoenix/Products
Create a folder with the name as your phone product type.
For example, for Nokia N97, the folder will be named RM-505
The firmware files you downloaded will then be located in C:/Program Files/Nokia/Phoenix/Products/RM-505

9. Now run PHOENIX and connect your mobile phone in PC Suite mode. If phoenix detects your phone automatically, skip steps 110-14.

10. In Phoenix, click File > Manage Connections > New.

11. Now select the type of cable you are using. If you are using DKE-2, CA-53, Micro USB cable, select USB.

12. Click Next. It will find your product and say FOUND. If it doesn’t find any, you can try changing your cable type by clicking Back.

13. Click Next and then Finish.

14. Now your cable type (USB) appears in the connection list. Select it. Click APPLY and then CLOSE.

15. Now select File > Open Product.

16. A list of RM codes will open. Select your phone’s RM code.

17. Now select File > Scan Product.

18. Your phone’s firmware info will appear at the extreme bottom of the Phoenix Service Software window.

19. Now select Flashing > Firmware Update. At this point, Phoenix will automatically load the firmware files we talked about in step 8. If it doesn’t, make sure you named that directory accordingly and please go over step 8 again.

20. If everything up to step 20 goes well, select “Refurbish”, wait until the “Successful” dialog box appear (DO NOT touch or disconnect the phone or USB cable during the process). Press OK, phone will disconnect and restart.

At the end Phoenix will tell you to disconnect your phone as the flashing has finished butome phones may not boot up automatically after the flashing has finished. In those cases, remove the battery and then insert it and manually start the phone.

 
FLASHING A DEAD PHONE WITH PHOENIX

 
The procedure is almost same as above but with litle differences.

1. Start Phoenix. Connect your phone through USB Cable (we are flashing a dead phone so the phone is off)

2. Click File > Open Product. Select your RM code from the window that appears. Click OK.

3. Click File > Manage Connections. Select No Connection. Then APPLY and CLOSE.

4. Now select Flashing > Firmware Update.

5. Check the option “Dead Phone USB Flashing”.

6. Click Refurbish and the flashing process is started.

7. After some time, flashing will pause asking you to turn on your phone.

8. Press the POWER button of your phone until the backlight comes up.

9. Flashing will proceed. Your phone will automatically start when the flashing finishes. When done, you can safely remove your data cable from handset.